According to a September 2010 interview of Rick Friedman, director of the manufacturing and product quality division at the Food and Drug Administration's (FDA) Center for Drug Evaluation and Research, "There has been an uptick in the number of warning letters for [good manufacturing practices (GMP)] violations sent out over the last year." The FDA provides guidance that is supposed to help companies meet requirements, but the increase in warning letters suggests that companies are still struggling to create and document good process validation procedures. Without extensive statistical knowledge, the requirements for GMP can be mysterious and intimidating
Fortunately, many of the requirements that the FDA has relate to common statistical tools. In this article, I'll introduce some of the common statistical tools you can use to meet FDA requirements:
• Measurement Systems Analysis
• Control Charting
• Capability
• Acceptance Sampling
• Stability Analysis
Using the correct statistical tools at the right time has two specific benefits with regard to manufacturing quality and FDA warning letters:
• Correctly applying statistical tools at the manufacturing facility reduces the likelihood of having a quality issue and thereby reduces the likelihood of receiving a warning letter.
• In the event a warning letter is received, the audit and resolution of the warning letter will be easier if the facility can demonstrate the correct use of statistical quality tools.
Measurement systems analysis
In manufacturing applications, one of the regular problems we have to confront is that the measurements we take are imperfect. Measurement system variation has the following negative consequences:
1. The risk of misclassifying a good part as bad and a bad part as good. See figure 1.
2. Additional variation embedded in the data results in an understatement of the quality level of the process. See figure 2.
3. Sample sizes for data analyses based on an inadequate measuring system must be larger to achieve a given power.
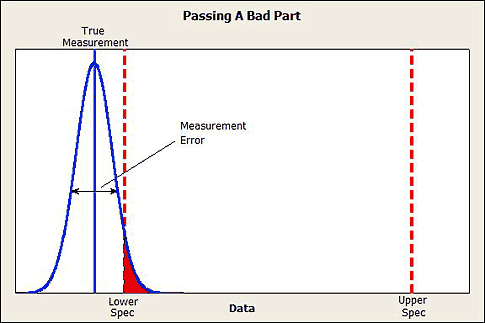
Figure 1: Passing a bad part
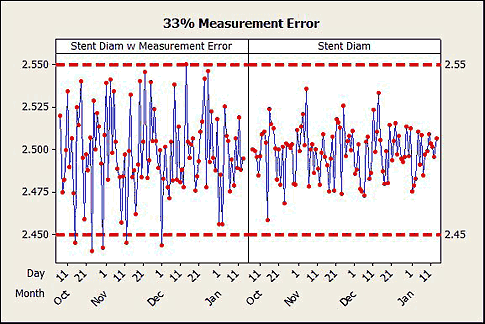
Figure 2: A 33-percent measurement error
We study measurement systems, often with gauge repeatability and reproducibility (gauge R&R) studies, to find out how precise our measurements are and to determine the probabilities that we make measurement errors. See figure 3.
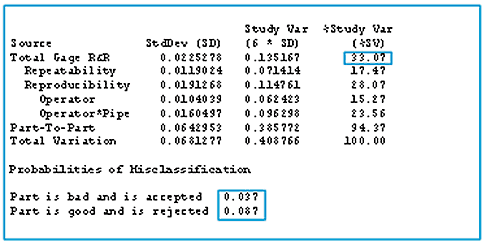
Figure 3: Gauge repeatability and reproducibility (gauge R&R) table
The objective in doing a gauge R&R study is to demonstrate that your measurement system is more than adequate for the use of statistical quality tools such as control charts and capability analysis.
In these cases where the measuring system is inadequate, we hope that we can identify the problem and take a corrective action. For example, the interaction plot in figure 4 can be used to identify an operator measuring differently (Jon measuring lower than Mindy and Cheryl) or a part that is difficult to measure (part 10).
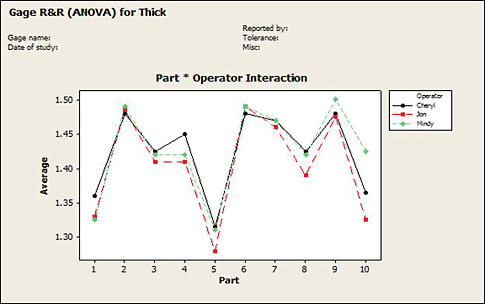
Figure 4: An interaction plot identifies an operator measuring differently or a part that is difficult to measure
In cases where we can't improve the measurement process enough, we can come up with modified specification limits or guard bands to control the probabilities of classifying a bad part as good. Guard bands use the measurement system variation from a gauge R&R study to define a narrower range of numbers than the specification limits so that we avoid describing bad product as good. See figure 5.
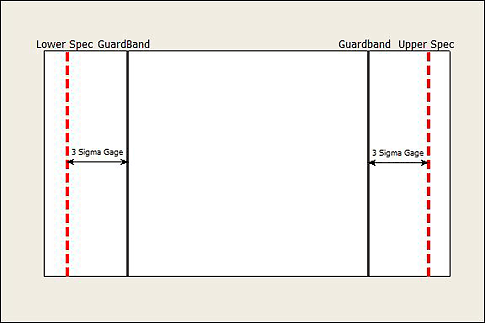
Figure 5: Guard bands use the measurement system variation from a gauge R&R study to define a narrower range of numbers than the specification limits
If your measurement system is good enough, then you're ready to use other statistical tools.
Control charting
The Current Good Manufacturing Practices for Process Validation published by the FDA in January 2011 states "homogeneity within a batch and consistency between batches are goals of process validation activities." Control charts explicitly compare the variation within subgroups to the variation between subgroups, making them very suitable tools for understanding processes over time.
Ideally, tracking quality metrics, such as the amount of active ingredient in product over time, can identify any changes in process behavior before the product is packed and shipped. Monitoring processes for control over time makes it much simpler to find the source of a change because data are available that show when the change took place.
A record of just an outcome variable alone, however, can be insufficient to identify a change. It's important that you collect and maintain other process data that can be used to identify the cause of an out-of-control process. In addition to the time data that a control chart can preserve, variables such as operator, shift, manufacturing line, line speed, mixing time, mixing speed, and raw material characteristics can be extremely useful for root cause investigations. That way you can use techniques like regression to look for associations between these variables and the process outcome that make it possible to identify the root cause of a change in the process. For example, a batch of raw material appears to be the cause of the special cause variation seen in figure 6.
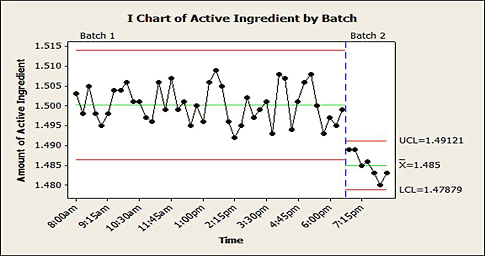
Figure 6: An i-chart of active ingredient by batch
Capability
When your measurement system is adequate and your process is stable, you can accurately describe your quality level. There are four common measures of process quality level: Ppk, Pp, Cpk, and Cp.
Ppk is the actual capability—what your process is currently achieving. See figure 7 for a display of Ppk values and the corresponding number of standard deviations between the process mean and closest specification limit.
|
Figure 7: Ppk values and the corresponding number of standard deviations between the mean and the closest specification limit
Pp reports the Ppk that can be achieved by centering the process. Cpk reports the Ppk that can be achieved by removing special cause variation over time. Cp reports the Ppk that can be achieved by centering the process and removing special cause variation over time.
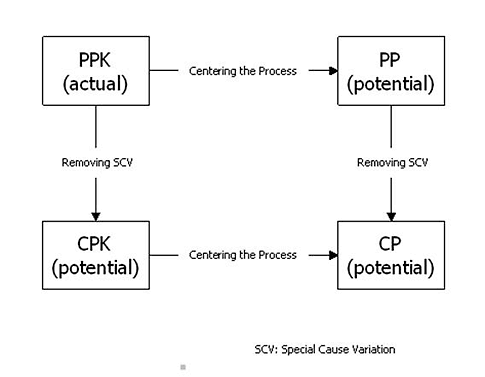
Figure 8: Reports of common measures of process quality level
Comparing the different measures of capability can help you decide what types of process improvements are needed to improve the quality.
Acceptance sampling
Many problems with quality begin with the raw material that goes into a process. Acceptance sampling is an inspection and evaluation of the product before it enters or as it leaves the facility. The goal of acceptance sampling is to ensure that defective product does not enter or leave the manufacturing facility. However, acceptance sampling can also alleviate other pressures. During the September 2010 interview with Friedman, he also reported, "Under U.S. law, the contracted firm is an extension of the contract giver's operation, so the latter has full responsibility to ensure that product is manufactured in accordance with GMP. The FDA is considering making drug makers even more accountable for problems at their manufacturing partners, for example by sending warning letters to the contract giver as well as the contractor if a deviation is discovered during an inspection."
There are two main types of sampling plans: attribute and variables. To generate a sampling plan in Minitab Statistical Software, for instance, you have to specify four parameters:
• An acceptable quality level (AQL). The defect rate you are willing to accept for a high percentage of the time.
• A rejectable quality level (RQL). The defect rate you want to reject a high percentage of the time.
• The probability that a lot will be incorrectly rejected at the AQL (alpha)
• The probability that a lot will be incorrectly passed at the RQL (beta)
The probability alpha, also known as the producer's risk, is the risk that adequate product is rejected. The probability beta is known as the consumer's risk because defective product is accepted. The AQL, RQL, and associated risk probabilities will depend on the costs of shipping bad product, and inspecting and scrapping good product.
An attribute acceptance sampling plan consists of a sample size and accept number. If the number of defects found exceeds the accept number, the lot is rejected. Otherwise, the lot is accepted. Rejected lots are either fully inspected or scrapped.
Two statistics that are often reported with acceptance sampling plans are average outgoing quality (AOQ) and average total inspection (ATI). Average outgoing quality represents the defect rate after implementing a sampling plan. For example, a process with a 0.5-percent defect rate might have an AOQ of 0.2 percent after a sampling plan is implemented. If AOQ is unacceptably high, you should adjust the parameters of the sampling plan. Average total inspection represents the average number of pieces that you inspect. In Minitab statistical software, the ATI calculation assumes that you inspect the entire lot if the product does not meet your acceptance criteria. This average is based on the proportion of the time you accept a lot based on its incoming quality. The lower the ATI, the lower the cost of inspection. See figure 9 for AOQ and ATI curves.
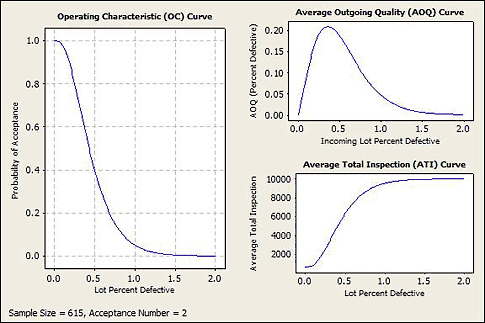
Figure 9: Average outgoing quality (AOQ) and average total inspection (ATI) curves
Variables acceptance sampling plans typically have much smaller sample sizes than attribute acceptance sampling plans. Because of their efficiency, variables acceptance sampling plans, when possible, are preferred over go/no-go attribute sampling plans.
Acceptance sampling lets you make data-driven decisions about whether to let material into your manufacturing facility and whether to release finished product.
Stability analysis
Now that your product leaves the facility in-spec, the question becomes how long does it stay in-spec? Stability analysis evaluates how your product degrades over time during shipment and storage. Stability analysis can be used to:
1. Determine expiration dates
2. Determine the likelihood of product surviving to an already established expiration date
The data collection for stability involves taking samples from at least three batches, storing the samples at the manufacturing facility, and measuring samples from each batch at regular time intervals. See figure 10 for an example of stability analysis.
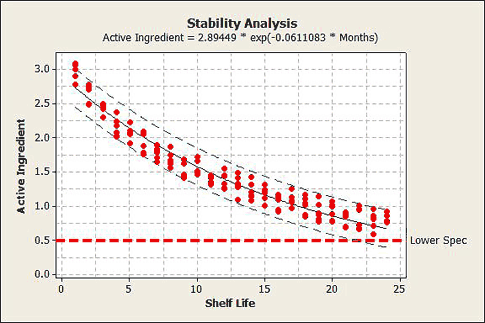
Figure 10: An example of stability analysis
Maintaining data and documenting the process
Don't assume that storing data in an analysis-ready format is an easy task. FDA warning letters have tight deadlines. If you do not have data already collected and stored in an analysis-ready format, you may be in a panic to get the necessary information before the deadline.
It is also important to have the statistical tools and approaches used by your facility documented. Areas that need documentation include: sample sizes, confidence levels, acceptable quality levels, and statistical techniques.
Sample sizes to use or a description of how to calculate sample sizes for each test/analysis. For example, "when performing a capability analysis, randomly sample 100 pieces from production over 10 batches."
Confidence levels to use for statistical tests and confidence intervals. Typically, the confidence level is set at 90 percent, 95 percent, or 99 percent, depending on the application.
Acceptable quality levels to use for each product. This can be in terms of Ppk or can be a statement such as, "You need to be 95-percent confident that at least 99 percent of the product is acceptable."
Statistical techniques to use. For example, for a specific control chart application, specify:
• The type of control chart to use
• The recommended subgroup size
• The frequency of sampling
• How out-of-control points are identified
• How out-of-control points are to be handled
How to perform the analysis, for example, in Minitab Statistical Software:
• Choose Stat > Quality Tools > Control Charts for Variables > X-bar
• Enter a column of measurements
• Enter a subgroups column
• In Options & Tests, choose tests 1, 5, and 6.
Being prepared with the appropriate documentation can make all the difference if you receive an audit or a warning letter.
Summary
When you use the correct statistical tools at the right time, your manufacturing processes become more understandable, they achieve a higher quality level, and you become better prepared to explain how your processes work to others. If you receive an FDA warning letter, you'll be well-prepared to demonstrate the correct use of statistical quality tools in your response. More important, ensuring that your processes are producing the quality your customers need means that you won't receive a warning letter in the first place.

No comments:
Post a Comment
Please feel free to contact or comment the article